I recently changed my XBMC server to use an HDMI cable rather than a VGA to Composite connection. Unfortunately I had many issues getting it to pass sound.
I updated my Ubuntu from 10.04 to 11.10 hoping that would help and it didn't immediately. I ended up having to build XBMC from source along with installing other crud. Also ended up losing some source code :(
VERY long story short... I ended up changing my XBMC setup to disable DTS and AC3.
Sunday, December 25, 2011
Sunday, November 20, 2011
House Stuff
To date, I have done the following things to this house (not in this order):
Replace all door locks (me)
Replaced the well pump (professional plumber did it)
Replaced the well tank twice (my friend and I)
Installed Carbon and Sediment whole house filters (my friend and I)
Replaced the furnace & A/C and relocated within basement (professional installers)
Replaced the Water Heater (my friend and I)
Replaced Water Softener (my friend and I)
Replaced the roof shingles (neighbor, brother, inlaws and I)
Replaced garage side door (inlaw and I)
Replaced garage door (professional installer)
Replaced garage door opener (inlaw and I)
Changed out garage dual plugs for quad plugs (me)
Painted inside of garage (me)
Stained house twice (me)
Replaced all 4 downspouts (me)
Changed out Dishwasher (me)
Removed wall paper from Bathroom and repainted & install new molding (wife and I)
Repainted 3 Bedrooms, Living room and Computer room (wife and I)
Framed out, insulated, dry walled and wired basement (me)
Added inverter to run part of house when power goes out (friend and I)
Installed built in Desks & Shelves, replaced carpeting and rewired computer room (me)
Wired house for network (me)
Replace Fence (Friend, inlaw and I)
Remove fence around patio (me)
Install ceiling fans in 3 bedrooms and computer room (me)
Install storage shelving in basement (me)
Replaced the garbage disposal (me)
Installed RO Filter (friend and I)
Installed TV antenna (me)
Replaced several cabinet drawers (me)
Built playset (inlaw and I)
Dug Firepit (me)
Built garden boxes (me)
Cut down 6 trees (friend and I)
Cut down several bushes (me)
Plant several trees (wife and I)
Plant bushes (wife and I)
Things yet to do:
Replace all windows (professional)
Replace front door (me and someone else)
Replace kitchen cabinets (professional??? or maybe me... )
Jack of many trades... master of some...
Saturday, October 8, 2011
Some Progress
I got the majority of the wires in place... have maybe 8 left then I think I have to mount a couple caps, LEDs and resistors then I can start on the other board... still have a lot of work to do but at least its moving along again.


Friday, October 7, 2011
Not much progress
Have been pretty burnt out from work so I haven't done much on the cube. Will fix that this weekend :)
Here are a couple of pictures of the circuit board in its current state. As you can see, I've started putting on the wires... there will be 56 of them. Also got the solder braid and cleaned up the spots that bugged me.
If you look closely on the right of the picture you can see where I glued the circuit board. Its holding nicely so I'm continuing on.


Talked to one of my friends today (hi Jon!) and he gave me some good ideas on the base so I will be exploring that. He also sent some links to interesting things... One for a power module that might actually work out for my cube so I'll probably buy a couple just for fun (http://www.pololu.com/catalog/product/2110) and a couple of videos related to an astromech project that he is working on... Not sure I'm willing to take on a project like that but it sure looks cool. Maybe next year? :)
Update: HOLY COW the shipping is expensive on those Pololu things... $18 for 2 $15 parts... wtf
Sunday, October 2, 2011
Slow Progress
It appears that the glue I used is holding so we should be good. I'm continuing on with the board.
I forgot how much detail work there is in soldering. Lots of tiny little solder joints not to mention tiny wires. I have to put on 72 wires yet. Not really looking forward to it but it has to be done or I'll never get the board done. The board I'm working on right now is the one that connects to the LEDs and even if I was using an arduino I would have to have this board... ah well. It is what it is.
I think I have all the parts I need, the only thing I need yet is some solder braid to wick out some mistakes... but I can probably live without it...
On a side note, I would not recommend getting the PanaVise Jr. It does the job but just barely. I should have sprung for the full Panavise... it was only 3x the price... :)
Friday, September 30, 2011
Disaster maybe averted
So I was pretty depressed about breaking the PCB and I went ahead and ordered a bunch more just in case but then I just let it sit for a day or so. Went back to it yesterday and decided that I should be able to glue the board back together. Did that and it turned out OK. Seems to be holding and I 'think' that I can still solder properly. Right now I need some 30ga wire so I'm going to stop by radio scrap to see if they have any. Not sure where else might have it in town (wally world?) Once I get that then I'll attempt to solder by the broken part and see if it works... fingers crossed.
Other than that not much progress.I am going with running wires instead of long solder traces... its just plain easier. I have copper wire and something else (same stuff I used on the cube) so the positive and ground wires will be 2 different colors of bare wire. Just to make it easier to tell them apart.
Think I need some solder wick too... hoping to get that tomorrow.
Wednesday, September 28, 2011
DISASTER!
I broke the PCB I was working on (the nice pictures you see below). Don't think I can salvage it. Guess I will desolder everything and start over. Wish I hadn't cheaped out and only bought the number of PCBs I needed. Took way too long to get these... :(
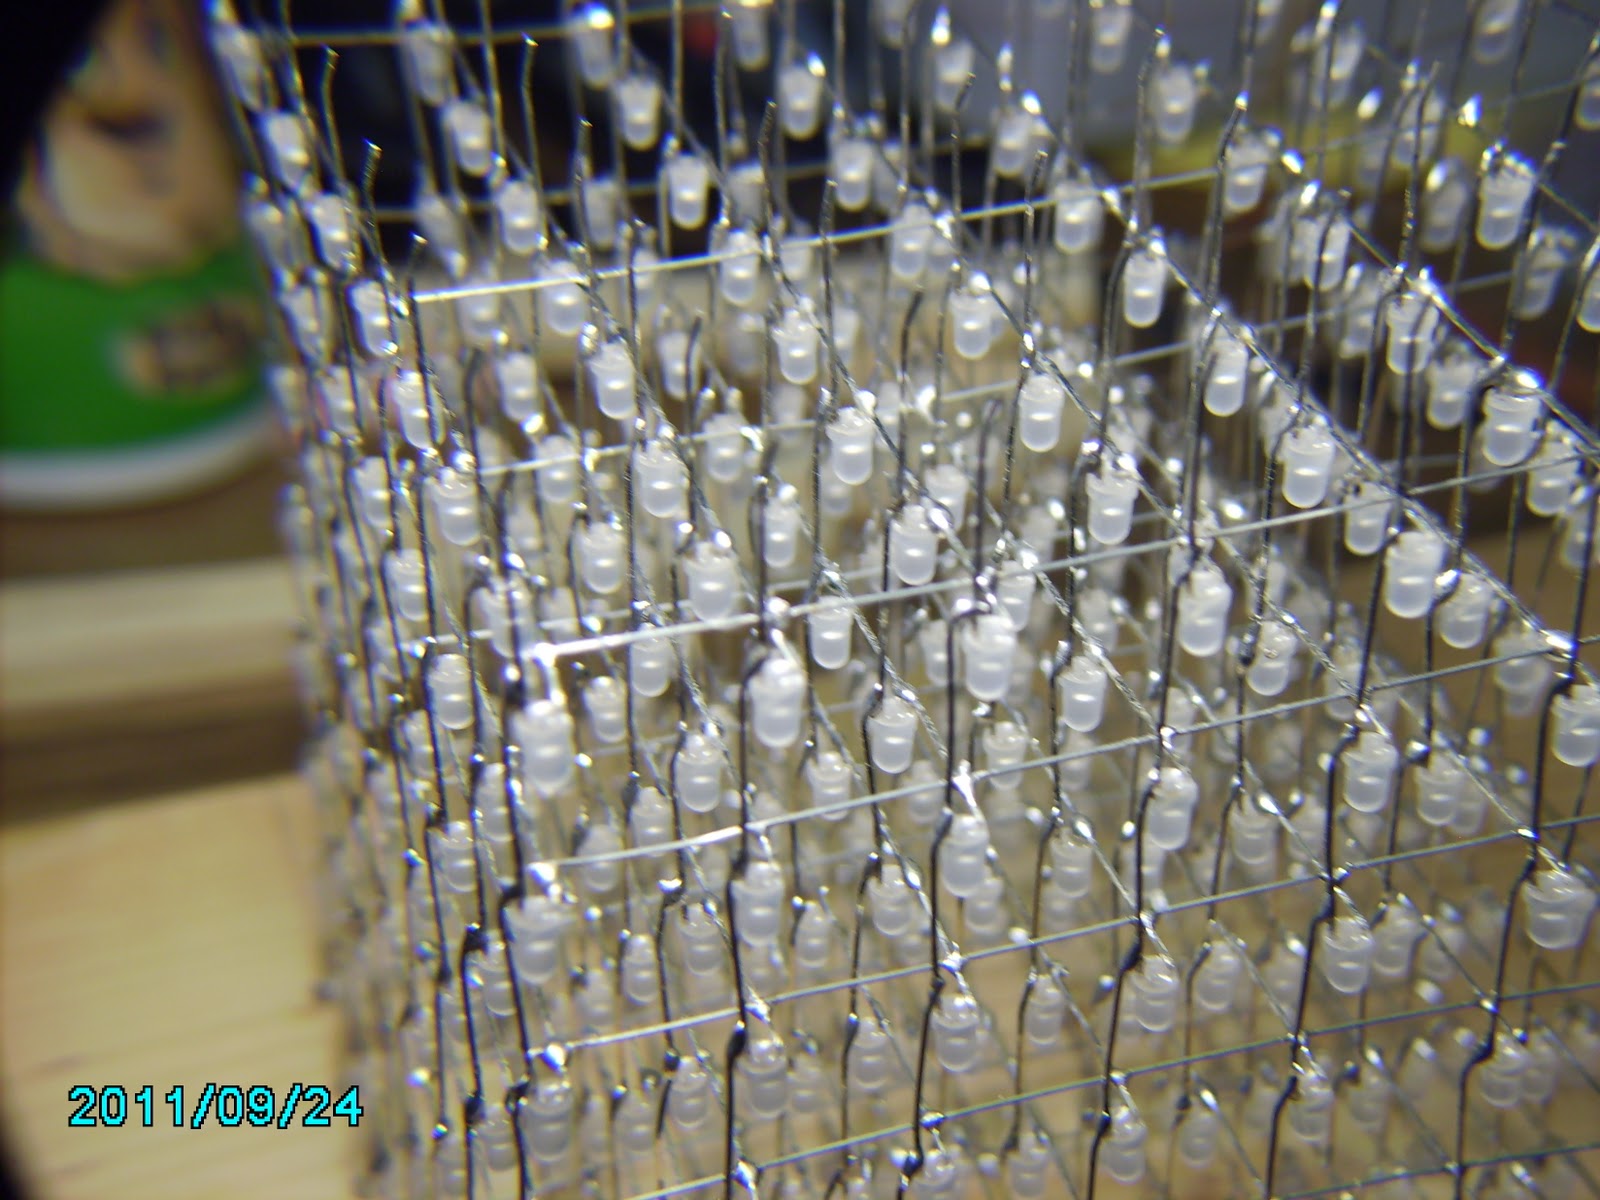
Saturday, September 24, 2011
Circuit Board started...
Here are a couple of quick shots of the progress on the first circuit board:


Time for bed
p.s. Sorry for the crappy pictures, I didn't realize the camera was doing that... they look reasonable when they are small. The next set of pictures I take will be better.


Time for bed
p.s. Sorry for the crappy pictures, I didn't realize the camera was doing that... they look reasonable when they are small. The next set of pictures I take will be better.
Whats Next?
Whoo Hoo! I've got all 8 layers soldered together. It looks really cool and is super stable. It was a lot of fun to build. Here is a picture:


The rest of the parts arrived, here is a shot of them:

I also put together the USBTinyISP device. I didn't take any pictures of it so if you want to see some just take a glance at the instructions I followed, they have tons of pictures and mine look very similar (only a little 'cleaner') ;) : http://www.ladyada.net/make/usbtinyisp/solder.html
Next I guess I'll start working on the electronics for the cube itself. I'll post pictures of that as I make progress.
This is the most fun I've had with electronics in a long time.
Friday, September 23, 2011
Stacking, stacking, stacking, stacking...
I'm up to 4 layers stacked together. 4 more to go...those are the spacers I'm using (took way too long to make those just the right size...
I will continue working today and see how far I get.


I will continue working today and see how far I get.


Stacking started
Got 2 layers joined, and yes K.H. it seems to be very stable. Having a really good time with this.
I decided to do a little math. Each layer contains 64 LEDs and 2 'braces' for a total of 80 solder joints. There are 8 layers for a total of 640 solder joints. Each layer must be soldered to the one below (or above depending on your viewpoint) for a total of 64 solder joints per layer for a total of 512 solder joints (I'm including the solder to the wire that goes to the circuit board). For a grand total of 1152 solder joints.
That's not counting the soldering that I will have to do for the circuit board :)
And yes, I'm testing the layers as they get attached, I make sure the whole column light up... so far so good.
Where are the rest of my parts???!!!
Now I have to go to bed because I have to work tomorrow... wish I could stay here and solder the rest of the layers.
Thursday, September 22, 2011
Bending Pins
I'm starting to work on getting the layers stacked, and the hardest part is getting the spacing correct. I'm going to use little wooden pieces to separate the layers because my pins are a lot shorter than the ones from the instructions. I've cut maybe 30 of them so far and I think I finally got the spacing right.
Now I have to bend all the pins over just a little so the layers can join. To get the bend, I took a hardwood dowel and drilled the smallest hole I could into it a couple mm deep. Then I put the layer back in the soldering jig and support the side of the wire with one of the spacing pieces. I put the dowel on the wire and bend in the direction I want. It goes really fast because I put the hole as close to center I could which makes it easy to line up.
I'm bending all layers before I start soldering and while I have it in the jig, I'm retesting each LED to make sure its as bright as the others (or at least very close). So far I've only found one dim one so I replaced it.
Still waiting on parts. Some came today but no one was home and it has to be signed for so I'll have whatever that is tomorrow (I suspect it is the circuit boards).
After all the layers are soldered together I'm going to work on the USPtinyISP kit.
Haven't figure out what I'm going to mount the cube to yet, however, I am leaning towards mounting it in the template as soon as I clean it up a bit and maybe router out the bottom a little so the wires will poke through.
I will continue progress updates as I have them :)
Wednesday, September 21, 2011
Still moving right along
Currently have 7 of 8 layers done, will most likely do the final layer today. Then its time to start stacking.
Got the Panavise today. Its not as robust as the ones I used @ skewl but it should do the job. Thinking I should have gotten the suction base or something... might mount it to a board that I can clamp to my desk... don't know yet.
Still waiting on most of the electronics parts... will have to check to see where those are :)
Sunday, September 18, 2011
Lots of progress
I made a lot of progress today. I've got a full 5 layers made... 320 LEDs soldered!
I made a short video just so you can see the trouble I go through when working on each layer. Video can be found here: http://vimeo.com/29242667
Depending on how the week goes, I should be able to have all the LEDs soldered and the cube itself made by the weekend but we will see. For now, I'm tired and its time to go to bed. :)
Saturday, September 17, 2011
LED Layer 1 Complete
It is very fine work and at times it is hard to keep the LEDs in line but I was able to complete layer one. maybe I should have practiced a little before moving forward but what I figured it doesn't have to be perfect just reasonably nice.
I bought a new solder iron stand. The one I had was just the cheap little aluminum one that you lay it on the desk... wasn't comfortable with that thought. Bought one at Radio Scrap for about $9 but my iron didn't quite fit it so I used a grinding wheel to make the hole a little bigger... works great now. Also picked up an 8oz spool of 60/40 rosin core solder (.032" diameter). That should be more than enough for the next 100 years... unless I decide to finish my electronics degree and then start making cool stuff left and right... hmmmm... thats a thought. :)
Here are a couple of pictures of the first layer... just 7 more to go, although depending on how the others go I might make an extra layer to replace my first one :)


Work has begun!
I made the LED template, drilled all 64 holes with a 1/8" brad point bit. That made it really easy to get it centered on the grid.
I started soldering the LEDs together... man they are tiny. 3mm is a lot smaller than I thought and my fingers are not exactly small so its a little hard to work with. I've got 22 of the 64 LEDs in place for the first layer. Still have to figure out where I'm going to put the layers as I get them done. But I'm very happy with the progress I've made so far.
Ordered a Panavise 201 today, should have done that a long time ago but was just always too cheap to do it. Now I 'need' it in order to build this thing and the supporting equipment (USBTinyISP).
This is going to be one really fun project... wish you were here :)
Thursday, September 15, 2011
LED Parts starting to arrive
The parts are starting to come in... I bought the 3mm LEDs and they are a bit smaller than I envisioned... not sure if I'll keep using them but we'll see.
Not sure if I should start by putting the USBtinyISP together or if I should start with the LEDs... decisions, decisions.

Not sure if I should start by putting the USBtinyISP together or if I should start with the LEDs... decisions, decisions.

Saturday, September 3, 2011
LED Parts Ordered
I went ahead and ordered the parts for the 8x8x8 LED cube. Missing one or two pieces yet put otherwise I have everything set. Will take a couple of weeks to get everything as I ordered some from China :)
Now I just need to start preparing the work area and other things...
Wish me luck!
Now I just need to start preparing the work area and other things...
Wish me luck!
Sunday, August 21, 2011
Soda Can Airplane - continued
I found this site today http://allaboutbeer.com/235airplane which shows a plane similar to the one I have. Will have to try making one. A little disappointed that the instructions aren't more detailed. Seems like they always assume you know more than you do. :/
The biggest problem I have right now is cutting the cans. I always end up with pointy pieces hanging off. :(
If / when I make one I'll be sure to post a picture. Might even try to document what I do for others :)
The biggest problem I have right now is cutting the cans. I always end up with pointy pieces hanging off. :(
If / when I make one I'll be sure to post a picture. Might even try to document what I do for others :)
Sunday, August 14, 2011
Book Database - Continued
Programs are moving along nicely. I have 459 books in the database so far. I can search by Title, Author and Genre and display the info. Still need to make a way to indicate that a book was read and by whom. Will want to the ability to modify the data too because sometimes I pulled double descriptions and its annoying to modify the database directly.
The Barcode scanner is annoying because I had to increase the timeout more to get all the codes. Will have to revisit the technical specifications to see if I can tell what is going on (betting that the code I have is a little lacking...)
Was able to reset both scanners to defaults and now they both beep when a code is scanned, just so I can confirm it :).
Have a lot of books that don't have barcodes so I'm manually typing in the ISBN. Have some books from the 50s that don't have the ISBN so I'll have to figure out how to manually get them into the database :).
All in all, I'm pretty happy with the way it is turning out.
Thursday, August 4, 2011
Book Database
Well, my book database is moving right along. I found that the barcode on the back of the book isn't very reliable so I've moved to the ISBN number on the inside cover and this barcode seems to give me good data consistently. The problem is that those barcodes are only included on books made after 1986.
I scanned about 50 books with my Symbol CS1504 barcode scanner and when I went to pull them in with my program I only got 19 records... WTH? In trouble shooting the code (C#), I found that if I paused 750 miliseconds after each 'batch' read from the scanner that I would get the correct number of barcodes. Very strange. My current theory is that the code is just too fast for the serial comm to keep up.
So I have those codes stored in a database and now I am working on the program that pulls the data from Amazon (PHP). I've got it pulling the data and putting into my book object, now I just need to write the code to store that data into the database.
After that I will work on the code to view / search / edit the data (PHP).
Thursday, July 14, 2011
AS400 / iSeries Fun
Where I work we still have some Cobol programs in use and I am the only one that supports them. I decided that I needed an easy way to pull the source code to my PC so I could use a slightly more friendly way to review the code and figure out what it does (so I could replace it with C# code).
Turns out that old school is the way to go. I FTP'd into the server, changed into the appropriate library and did a get on the source file I wanted. Very nice and easy. Then I decided why not just pull it all so I did an mget and it worked. Very nice! Dropped all the source onto a Linux box so I could grep it anytime I wanted. Did a WC on it and found that we had about 1.5 million lines of code spread across 7000 programs.
Wanted to share how I did it for others:
cd (some folder here to store the source files)
ftp servername
Enter Username & Password
cd (library here)
prompt (to turn off prompting for each file)
mget source.*
(wait for it to finish)
quit
Enjoy!
Saturday, July 9, 2011
Finished TARDIS Piggy Bank
Thought I would share pictures of the TARDIS "Piggy Bank" I made for Sam. He chose the color. It is 17" tall by 7.25" wide (square). The light on top is a single LED bulb that cycles through 7 different colors and flashes. It can also show any one of the individual colors (by pressing the black button). Josh's is very similar but blue and a little bit shorter.


Saturday, July 2, 2011
Old but still great code
I decided to resurrect some old 3D dot rotation code (1993). It was in C so I converted it to C# (not a big stretch) and it works pretty good. The key was double buffering.
Right now I am working on a whole 'font' that will allow me to rotate just about any string.
(these are predefined elsewhere but thought I would include them so you could see how the are created)
offScreenBmp = new Bitmap(this.Width, this.Height);
offScreenDC = Graphics.FromImage(offScreenBmp);
backBrush = new SolidBrush(Color.Lime); // i set the form transparency key to this
this.TopMost = true;
the 'display' code looks like this (I will be cleaning it up later):
private void DoDotAnimation()
{
while (! ClosingIt)
{
MoveDots(); // never guess what this does...
Graphics clientDC = this.CreateGraphics();
offScreenDC.FillRectangle(backBrush, 0, 0, this.Width, this.Height);
Color newColor = System.Drawing.Color.Red;
for (i = 0; i < PointsN; i++) // run through the dots array and draw them { if ((TheNewDots[i, 0] > -1) && (TheNewDots[i, 1] > -1))
offScreenDC.DrawEllipse(new Pen(newColor, 2), TheNewDots[i, 0], TheNewDots[i, 1], dotSize, dotSize);
}
clientDC.DrawImage(offScreenBmp, 0, 0);
Application.DoEvents();
}
}
Sunday, June 19, 2011
Cool ASCII Text Generator
Found this cool ASCII Text generator awhile ago... thought I would share with you http://www.network-science.de/ascii/
________            __________
___  __ \_____________  /___(_)___  ________ ___
__  /_/ /  _ \_  __ \  __/_  /_  / / /_  __ `__ \
_  ____//  __/  / / / /_ _  / / /_/ /_  / / / / /
/_/     \___//_/ /_/\__/ /_/  \__,_/ /_/ /_/ /_/

________       _____
___  __ \_________(_)______ ________
__  /_/ /_  ___/_  /__  __ `__ \  _ \
_  ____/_  /   _  / _  / / / / /  __/
/_/     /_/    /_/  /_/ /_/ /_/\___/
Saturday, June 11, 2011
Soda Can Airplane
Many, many, many moons ago, I was given a Soda Can Airplane made out of Mountain Dew cans. I've always wanted to make another but with the "Pitch Black" Mt Dew cans.
I've looked all over the Internet for 'free' plans but no one has them.
I found this site today: http://www.sodaplanes.com/pictures/cutting%20cans.pdf that at least gives me good instructions on how to cut the cans.
Now if I can just figure out how to build a duplicate of the one I have I'd be really happy. My boys would be very happy too because they would get one :)
I also found a site that sells plans for making a corsair (my favorite plane... probably due to Black Sheep Squadron), but I'm thinking I'm too cheap to buy them... at least for now... Someone else can feel free to buy them and send them to me... :D
Wednesday, May 4, 2011
Totally Want to build this
I've seen these before, but never saw a comprehensive "How To" to make one. I really would LOVE to build this.
http://www.instructables.com/id/Led-Cube-8x8x8/
http://www.instructables.com/id/Led-Cube-8x8x8/
Sunday, May 1, 2011
Web Hosting Picked...
For the past 11 years I have had my own physical server Co-Located with Kansas Hosting. They have been EXTREMELY helpful and have taken complete care of my server. Over the years they have fixed any issues (even ones that I caused myself) and have been a terrific provider.
I originally went with them because a friend of mine worked for them (Hi Brian!) and convinced the owner to co-locate at a reasonable rate (a 4U server). Several years later, I built and setup a new server (a 1U server) and sent it to them, and presto, my co-locate rate dropped even more.
With that in mind, I contacted them to get an idea of how much bandwidth my server uses in a given month. Unbeknown to me, they hooked my server up to an un-metered network connection (unlimited bandwidth). I was floored... customer service above and beyond to say the least.
So I explained that I was tired of upgrading my server every 5 years or so and was considering a new hosting solution. I told them what features I was looking for and what my price range was.
And you know what? They came back and said THEY had the solution for me and would provide it at the same price I've been paying for the last several years.
These guys are truly customer oriented and all around fantastic to work with. I would recommend them any day.
Kansas Hosting
Saturday, April 23, 2011
Web Hosting Recommendations???
Ok... next question for my geek friends. I'm thinking about going with a different web host.
Currently I have my own physical server connected to a 10mbs internet connection which costs me about $281 / year. There are no bandwidth limits (at least I have never hit it in the 11 years its been there). Its running an older linux (I redid the server once) and I would love to upgrade, however, the server is in Kansas so not really accessible. Its a 3ghz Intel with Hyper Threading, 1gb Ram, 120gb Sata hard drive (5gb used). I'm currently hosting 10 domains on it some running MySql.
I've heard good things about 1and1.com , dreamhost.com and slicehost.com. My personal preference would be a private server (virtual or otherwise) but not tied to that. Would like to stay within the $300 / year price range.
Anyone have any recomendations?
Sunday, March 13, 2011
Ancient Backup Files - Part 2
So I spent the last several hours (mostly since my last post) looking at these ancient backup files again and I actually made some headway. I also found that my HEX skillz are very rusty :/
Here is what I have figured out so far
Of course, I'm doing it in C#... suppose I could have done it in PHP but I guess I just figured it should be a windows app. Using BinaryReader to get the data and BinaryWriter to write it to disk.
Here is what I have figured out so far
* Junk             16 bytes - no clue what this is and I don't think I care
*
* Start of block       4 bytes     FF FF FF FF
* Header Descriptor    8 bytes
*      Header size     2 byte
*      Other Data      6 bytes
* Header               (Header Size Bytes)
*      Stuff           8 bytes
*          Something
*          Date / Time
*      File Size       4 bytes
*      File Name       12 bytes
*      String Separator 1 byte      00
*      Full Path of file (variable)
*      String Separator 1 byte      00
* Unknown Data     4 bytes
* File Size        4 bytes
*
* File Data (variable)
*
* File Trailer     4 bytes
I was able to pull the first file out properly, now to write the routine to cycle through the whole 'tape' and see if I can pull in all the files :)
Of course, I'm doing it in C#... suppose I could have done it in PHP but I guess I just figured it should be a windows app. Using BinaryReader to get the data and BinaryWriter to write it to disk.
Saturday, March 12, 2011
Ancient Backup Files
A number of years ago, I used the dd command on Linux to extract data from some backup tapes I created using Norton Desktop back in 94(?). Unfortunately, dd didn't know the layout of the tapes so I really just have a few large files that contain the files that were actually backed up.
The tapes and hardware are long gone so there is no hope of hooking up and using old software to retrieve the files.
I've glanced at the files with a hex editor, and it definitely seems possible to write a program that would extract the files appropriately, however, every time I look at it, my brain hurts :)
One of these days I'll be able to create the proper routine to do it, just haven't looked hard enough.
Tiny parts really annoy me
I got my boys these light 'swords' that have a button on them and a set of 3 different colored LEDs.
Little boy likes to hit things with his and because they are so wonderfully made (not) some of the LEDs stopped working.
So of course, that is a major crisis.
I take it apart on my desk, extract the LEDs from the tube and 2 wires instantly drop off. Of course these are the teenyest tinyest wires in the world, and my fingers aren't exactly 'lady' fingers.
Long story short, it was a pain the in 'you know what' but I did get it working again and the boy is happy.
Wednesday, March 9, 2011
Web Color Scheme Designer
Found this site today... thought it was pretty cool so I thought I would share: http://colorschemedesigner.com/
Subscribe to:
Posts (Atom)